The Bench Press - Anvil Training Series 10
By Marshall Officer
What is the Anvil Training Series?
The Anvil Training Series is a series of 12 articles throughout 2020 about key training concepts, written for the general reader. Physical training, in some form or another, should be a part of everyone’s life. Most of the basic concepts are very easy to understand and implement, although these days - the industry has become muddied with complicated variations of basic concepts that can make choosing how to train quite intimidating. These articles are here so that you don’t need a degree and ten years’ experience to separate what matters from what doesn’t, and aim to help you navigate the muddy and ever-changing waters of the online fad fitness industry
Introduction
My last three articles in the training series are on the Bench Press, the Squat, and the Deadlift. The big three, as they are commonly known, or the power lifts - thanks to their place of honour in the sport of powerlifting. I understand that not everyone who reads these articles are powerlifters. Most of you probably lift for health, wellbeing, or just for fun. But, if you’re anything like me - you know that being strong is addictive, and some of the strongest people in the world are elite-level powerlifters. I have spent the past couple of years seeking out books, educational articles, and videos to help give me a comprehensive understanding of the lifts I train week in and week out, on my road to an elite-level powerlifting total. An essential component of a huge total is a big bench press, and getting pressing big is one of the toughest things you can achieve in a weight room or on a platform.
Why Bench Press?
“What do you bench, bro?” - Some asshole, circa every time a powerlifter or bodybuilder enters a commercial gym.
I want to start by saying that the bench press is, and has always been, the lift I have struggled with the most. I have been bench pressing since I first stepped foot in a gym - which is a long time to build up bad habits, poor technique, and unhelpful motor patterns that all work together to slow my progress in a lift that is, at face value, fairly simple. Everyone has the lift they love, which usually goes hand in hand with what they are best at. The biggest numbers always feel the best to move, and for me - the deadlift always came naturally. That isn’t to say my technique was anything close to good - my limb lengths and personal imbalances just led me to a bigger deadlift, and made finding my groove on the squat and bench much harder. This is a common theme amongst beginners. Why? Well, the deadlift is fairly simple. At the end of the day, just pick the weight up. If you get stuck, just let go. The same can’t be said for the squat, where a heavy bar can pin you to the floor. And, then we have the bench - which involves holding progressively heavier weights in your hands, with the risk of failure potentially meaning a heavy bar to the face. The more progress you make on the bench, the more dangerous it becomes.
So, why would we bother? Well, if you have any hopes of competing as a powerlifter, and having your strength officially recognised with a total in a federation somewhere - you have to bench. It’s one of the three lifts you will compete in, so there is no avoiding it. But for someone who isn’t a powerlifter, the bench is still one of the most recognisable exercises in the world. It is a common test of upper body strength in American Football, where 220lbs is commonly done for as many reps possible. It is used by bodybuilders to help build a full and aesthetic chest, shoulders and arms. It is used by strongmen and crossfit athletes to build upper body strength in a variety of planes - and it is used by every gym bro to assess whether you are worth their time. In the casual gym goer’s world, the 100kg bench press is a highly coveted achievement that is a mark of the time they’ve put in pumping iron.
In the men’s strength world, 315lbs (140kg, or a three-plate bench) is a respectable beginner’s benchmark, and 500lbs (227.5kg) is the bare minimum to put you within the global elite. The current world record raw bench press is 770lbs, set by Julius Maddox, who is currently on the road to an 800lb raw bench press (raw means without the assistance of a bench shirt, as used in equipped powerlifting). Not to mention, some of the best bench pressers in the world are the female athletes. Although the numbers aren’t as extreme, some of the most impressive feats of strength are women who are capable of pressing over double their own bodyweight in competition. For example, Heather Connor competes at 47kg and regularly presses over 70kg. Louie Simmons has said on multiple occasions that his female athletes are far stronger (relative to their bodyweight). Marianna Gasparyan, argued by EliteFTS to be the strongest female powerlifter of all time, competes in the 123lb weight class and has benched 292.1lbs in competition.
If you aren’t already blown away by the sheer force some of the world’s strongest people are capable of producing, you may still have doubts about the overall importance of the bench press. From my experience with Australian powerlifting so far, it seems like the bench press does not get the recognition or training time that it deserves. As far as I can tell, the argument is that a big squat and a big deadlift will go much further in creating a big total than a big bench press. Bench press is also a particularly technical lift - and the more progress someone makes, the harder it can be to nail the perfect groove with an extremely heavy bar predominantly supported by your hands. The risks of failure are higher, too. Shoulders are relatively unstable joints, meaning shoulder injuries and pec tears are common. Plus, nobody wants a heavy bar coming down on their head. So, why should you spend time on your bench? From my point of view, the reasons why many people don’t are the reasons why you should. If everyone is building a big squat and deadlift, and ignoring the bench, then building a big bench will put you ahead of all of these people.
A 200+ kg squat and a 250+ kg deadlift for most men is only a matter of time, caloric surplus, and consistent training. A 200+ kg bench will set you apart from every single one of those people. Additionally, an elite level 1 total in the Powerlifting Australia Federation is 710kg at the 105kg weight class. Unless you plan on squatting and deadlift over 300kg each, a big bench is going to go a long way in helping you achieve elite status. Not only this, but a bigger bench will add less overall muscle mass than a bigger squat and deadlift - resulting in a smaller change to your overall weight class, and a more impressive total relative to weight. A smaller change in body weight will also have a lesser effect on your deadlift leverages - meaning focusing a bigger bench could help with your overall total, rather than the old school method of piling on the bodyweight, watching your squat go up and your deadlift stall. Finally, no matter what the new-age purists say, a big bench is a status symbol. Being able to hold over double your bodyweight in your hands, control the descent, and produce the force required to press that weight explosively is the mark of a truly strong individual. Being able to do that, with the added risk of injury or even death from being crushed by the bar, is fucking exhilarating.
What’s Doing the Work?
The best way for me to address the muscles involved in the bench press is to address the different stages of the movement. For simplicity’s sake, I will break the bench press into three parts. Part one, which I call “the set up”, covers everything from lying on the bench, gripping the bar, to the unrack. Part two, “the descent”, is the lowering of the bar to the chest. Finally, part three, “the press” - when the bar leaves the chest, all the way through to lockout. The muscles involved with each part of the movement are not isolated to these parts, and have an effect on how each subsequent part’s success. For a truly strong press, all of these muscles and their involvement should be known - so that they can be identified when a sticking point occurs, and addressed in training so that weak point becomes a strength.
During the Set Up:
Just like any lift, I will start from the feet up. I will discuss it further in the next section - however, it is important to understand that your foot placement will dictate your overall lower body tightness. As with any lift, the tighter you can get, the better. This means that your entire lower body should be statically engaged, making it as rigid as possible. Primarily, this means driving the feet into the floor with the quads and squeezing the glutes to prevent the hips rising off the bench. Moving up the body, your erectors and core will be engaged in the same way. Whether you arch your lower back or not - your erectors and core must be engaged to ensure the rigidity and tightness built with the lower body transfers to the upper body.
Next, the upper back. Arguably the most important part of the set up - the scaps must be retracted in towards the thoracic spine, and down towards the glutes. This means you must be able to actively contract your lower lats, rhomboids, infra and supraspinatus, and anterior delts - as well as have the muscular endurance to hold this position for the entirety of the press. Finally, once a stable platform has been created with the scaps, the biceps and forearms are involved in gripping the bar. These muscles must be strong in order to maximise stability and force transfer into the bar. To unrack the bar, it must be brought out, not up. This is primarily done with the lats, so these must be trained to achieve maximum stability right from the start.
During the Descent:
The descent of the barbell is the eccentric portion of the bench press. Our one and only goal during the eccentric is to maximise our stretch reflex and reversal strength for an explosive press. This means all the antagonist muscles need to be strong and tight - and these muscles are the lats, rear delts, the upper back, and the biceps. As I stated earlier, the muscles used in the previous part carry over to this part to ensure success - so lower body tightness must be maintained through the descent to ensure good bar control, as well as maximise chances of success during the press.
During the Press:
Finally, the press. The press actually has two parts to it - immediately off the chest, and the lockout. The muscles responsible for the initial movement are the lats, responsible for rotation of the upper arm/shoulder; and the anterior delts and pecs, the prime movers in getting the bar moving upwards by bringing the arms out and together. Finally, for the lockout - the triceps are the prime mover. Strong triceps mean a strong lockout, but the bar will never make it to lockout if you don’t have strong and explosive lats, pecs and shoulders. One key point that I learned recently from an excellent bench press resource (“Bench Press: The Science by Josh Bryant”), is that the biceps must be both developed for stability, as well as have an extremely efficient neural connection to ensure the bar is able to be locked out. Your biceps aim to protect your elbows by activating under heavy loads, preventing lockout. If you do not develop your neural connection with your biceps, as well as actively train to overcome this inhibitory reflex - you will always stick a few inches off the chest and lockout will be impossible with heavy weights.
For anyone thinking that a strong bench press is solely the result of a big chest, think again. Delts, pecs, triceps, lats, upper back, biceps, forearms, erectors, hips, glutes, and quads are all significant muscles when trying to bench big, so make sure you train each of them appropriately.
A Beginner’s Guide to Technique
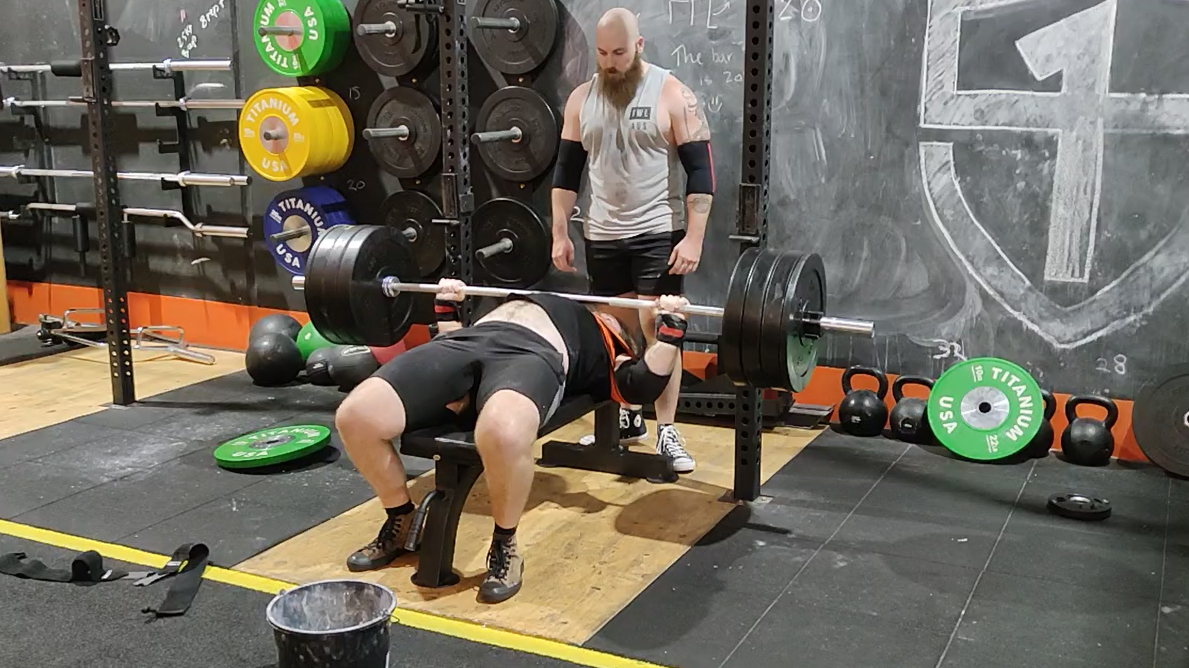
The bench press is a very technical lift. There is no debating that, no matter how much importance you place on the lift itself. The reason for its high level of technical importance is the vulnerability of the shoulder joint, the smaller size of the muscle groups doing the work, and the overall fact that you are supporting extremely large weights with just your hands. To accommodate for most of this, a good setup is essential. Most of the issues associated with the bench press can be addressed in the set up - and if you can set up properly, consistently, you will have a much better time with your bench press. Just like in the previous section, I will start with the feet and work my way up, beginning with foot placement. There are many bench press coaches out there who will probably tell you different versions of this story, however in my opinion there are two clear options when it comes to foot placement: tucked, or splayed.
The tucked position is fairly self explanatory, the feet are behind the knees, usually with only the toes on the ground. This creates a position with knees below hips, and can result in a fairly prominent lower back arch. The splayed position is the opposite, and usually has the feet flat on the ground, out in front of the knees. Ideally, we will still have a knee below hip position to assist in keeping the hips down - however, this position will generally result in a less prominent or even non-existent lower back arch. It is worth mentioning that this choice could be dictated by your federations rules. Some federations demand feet completely flat on the floor when bench pressing, and this can be very difficult to achieve in a tucked position. Either way, the end result is the same. We need to be able to create as much lower body tightness as possible. You may have heard the term “leg drive” being thrown about, and I will cover this later on - however, in essence, we need the feet to be firmly placed in a position where the quads, hips and glutes can all be statically engaged to create as much lower body rigidity as possible. This creates a strong base of support, and allows for the maximum amount of force transfer from your body into the bar.
The lower back and core position is generally dictated by the foot position. The amount of lumbar arch is something I will discuss further down - but, in my opinion, it is not an essential component for a solid set up, so I will not cover it more here.
As I said earlier, the upper back is arguably the most important part of the bench press. This is the part of your body responsible for supporting and stabilising the entirety of the weight on the bar, and if this is not done correctly - the shoulders will be placed in a compromised position, and the risk of injury to shoulders and pecs is much higher. The most common cue I have heard for this part of the set up is “pull your shoulder blades into your opposite back pants pockets”. The scaps should be pulled down and in as much as possible - essentially creating a flat platform that rests on the bench, giving your shoulder joint the safest possible range of motion when you lower the bar. This results in a thoracic arch, creating a “proud chest” and “shoulders back” position that must be maintained throughout the press. Importantly, the upper traps should not be flexed, as this will prevent the scaps from being retracted as much as they can be.
Finally, the bar should be gripped with your elbows remaining directly under the wrists at the bottom of the press. This grip width should allow for the longest eccentric, maximising stretch reflex and reversal strength - whilst also allowing for the best force transfer into the bar off the chest. Although some athletes will choose to grip as wide as possible to reduce their range of motion, this actually increases the risk to the shoulder joint and the pec, reducing the eccentric part of the press, and resulting in a less explosive press. The question must be asked: is a shorter range of motion as important as a faster, more explosive press? That is something you will need to decide for yourself. When unracking the bar, it should be brought out, not up. This movement is a result of wedging yourself between the bar and the bench so the least amount of upward force can be applied to the bar to get it to clear the hooks - and then the lats should be engaged to bring the bar out to the perfect position. This position will come naturally - as it will be where the bar feels almost weightless, with all of your joints stacked and the bench supporting most of the weight. If you feel tension on your wrists, elbows, or shoulders - try slowly moving the bar back and forth with submaximal loads to find your sweet spot. Make sure the elbows are locked, the scaps are fully retracted, and the wrists are not cocked back. I have found the best way to achieve a strong wrist position is by squeezing the bar as tight as you possibly can, whilst keeping your knuckles pointed at the ceiling.
Once this setup has been completed, the most important thing is maintaining overall body tightness. If you can do this, the rest of the movement should be relatively simple. Lowering the bar is done by bringing the bar straight down under control until it touches the chest (no shit, I know, however many athletes have a tendency to arc the bar down towards their stomach). A good way to maintain control over this bar path is to think about pulling the bar apart, or bringing the elbow straight down. This should ensure the bar is lowered with the lats - using the larger, stronger upper back muscles to support the heavier weights. Once again, tightness and control is the most important factor here.
Finally, pressing the bar off the chest. At this point, if you have taken your time, stayed tight, and maintained control - your primary focus should be unleashing all of that pent up force. All you need to think about is driving that bar as hard and as fast as possible, straight up, all the way through to lockout. Don’t worry about sticking points, your triceps, ripping the bar apart, or anything else. Just put everything you have into making that press as explosive as possible. If you do not use all the force to maximise bar speed - you will encounter sticking points, inhibitory reflexes, and eventual failure. Josh Bryant says it best in his book (referenced earlier): speed is the name of the game.
To finish, you must re-rack the bar and dismount. This part is fairly negligible, but I will mention that you should never press the bar back towards the hooks or the rack. Many beginners fall into this trap, as they think pressing it towards the rack will make it easier to re-rack the bar and get out from under the bar. Pressing the bar back towards the face is dangerous for the shoulder joint, as it doesn’t allow for maximum tricep activation, and actually lengthens the bar path - making the lift harder. Make sure you have a spotter for your heavy lifts, press the bar straight up to lockout, let the weight settle, then let your spotter re-rack the bar for you. When it comes to dismounting - most of us flounder off the bench in agony and exhaustion after a solid 1RM strain. Head over to Heather Connor’s instagram and check out her bench press dismount for an example of how to add a little style to your pressing game. It won’t make you any better at benching big, but it definitely adds a little grace to the sport.
To Arch or Not to Arch?
The arch is potentially the most controversial topic in the wide and wonderful world of bench pressing. Primarily seen in the powerlifting world, there are many athletes that could also be considered contortionists when getting into their bench position - with their feet closer to their shoulders than their knees, and an arch that would make the architects of the Arc de Triomphe foam at the mouth. When one of these athletes posts a video on social media - it is inevitable that a comment will be made that the athlete is cheating; that true strength in the bench press is done with a flat back, that reducing the range of movement is a low down and dirty trick that is only resorted to by those with weaker moral constitutions and sub-par quality of athletic ability. The people making these comments usually seem to have a higher than average number of shoulder injuries, have never actually competed in the sport of powerlifting, are not recognised coaches in any sense, nor do they seem capable of educating themselves outside of their narrow-minded limits.
First of all, when we consider the topic of the arch in the bench press - we should differentiate between the thoracic arch and the lumbar arch. The thoracic arch, in the upper back, is absolutely essential in order to achieve full scap retraction, giving a stable pressing position and safe shoulder range of movement. A thoracic arch is not very noticeable, and on bigger athletes - it may not look like an arch at all. However, this arch is necessary for a safe and strong bench press. If you do not arch your upper back and retract your scaps when benching, you are asking for injury - it’s as simple as that.
In contrast, the lumbar arch is primarily used to reduce the overall range of movement for the barbell. The more arch in the lower back, the less distance the bar has to travel, meaning more weight can be lifted overall. In competition, where a powerlifter’s goal is to lift the most amount of weight for one repetition, a small range of motion is a great way to lift maximum weights. Combined with an extremely wide grip, some athletes are capable of benching with only 1-2 inches of actual bar movement. However, we must remember that a smaller range of motion means a smaller eccentric - which also means less stretch reflex and less reversal strength for the raw athlete. A large lumbar arch has the potential to lift the scaps off the bench, and having the scaps flat on the bench is essential for maximum stability and force transfer into the bench.
As stated earlier, a wider grip also compromises the shoulder joint and places the pecs at higher risk. When you are making the decision on how much arch you want to achieve, you should take into account all of these factors. If you want to arch big in competition, if it is within the rules of your federation, and it gives you the ability to press the most weight - then go hard. However, I think it is important to assess how you are training, ask whether your scap position is truly your number one priority or if range of movement has taken that spot, and consider whether a slightly larger range of movement would result in a more explosive press, leading to bigger weights in the long term. There are risks and rewards associated with every decision in lifting, and at the end of the day, the choice is up to you.
Last but not least, I will cover the benefits of training some flat back variations. Remember, when I say “flat back”, I do not mean the thoracic arch. Full scap retraction for every bench press is essential for a safe and strong bench. Flat back solely refers to your lumbar arch, which is usually a product of foot placement. The benefits of training without an arch means that you will get stronger through a longer range of movement, or reduce the amount of lower body involvement in the press. This means that you will inevitably also get even stronger through your shorter, competition ranges of motion - making these variations extremely valuable tools to break through plateaus. Floor press is probably my favourite variation of a flat back bench press, where you can leave your legs lying flat and completely remove lower body involvement from the press. A strong floor press means an even stronger bench press. Flat back flat bench, incline, or decline press is also a good way to maximise range of motion - creating added challenge in the press at different angles for different muscle activation, and usually is just done by leaving your feet out flat in front of you, not emphasising the lumbar arch at all.
Finally, we have the dreaded legs raised bench press that will result in a completely flat lumbar spine due to posterior hip tilt. I believe this variation is overused by people who stand to gain very little from such an unstable press - but this variation can be useful for elite bench press athletes who want to completely remove their legs from the press, and want the greatest possible range of motion with a bar or dumbbells. This variation can also be done as a floor press, which has an added benefit of not being so unstable and also removing any pressure from the lower back for those that get lower back pain from other parts of their training or lifestyle.
God, Leg Drive, and Other Imaginary Concepts
“Leg drive is dead - Friedrich Nietzsche” - Dan Hunt, 2020
Another common throwaway line when it comes to bench pressing is the term “leg drive”. One of my favourite videos from EliteFTS (see references below) involves one of their athletes getting a bench press coaching session from J M Blakely, one of the most impressive bench press athletes of all time. She mentions leg drive, and he almost explodes yelling, “there is no such thing as leg drive!”
While I don’t necessarily agree with this, I do understand where he is coming from. Many coaches, and even more athletes, believe that during the bench press - your legs create a mysterious force that actually lifts the bar off your chest. There are even diagrams out there, all over Instagram, with arrows pointing down into the ground and others pointing up from the upper back - attempting to explain that by lying on your back and pushing your feet into the ground, a magical and extraordinary gravity defying force is created, lifting the bar off your chest and making the press easier. This is not a good understanding of the concept of “leg drive”. In purely physics terms, pressing your feet into the floor in no way produces an upwards force against the bar. What it does produce, however, is tension. Wedging your feet against the ground and isometrically contracting your legs, hips and glutes creates an incredibly rigid lower body, meaning that when you unrack a heavy weight, lower it to your body, and then explosively press it back up again - the absolute minimum amount of force is lost through weak or flexible areas of your body. In essence, the more rigid your entire body, the more force you can transfer through the bench back into the bar, without losing it to instability, weight shift, or compression.
As discussed earlier, this tightness is primarily achieved through foot position. When I coach my athletes, I generally tell them to put their feet wherever they want - as long as they can create as much lower body tension as possible and maintain it throughout the lift. Sometimes, this will need to be adjusted. Many people will push only down through their feet, resulting in their hips rising off the bench. This is due to leg activation but no hip or glute activation during the set up. Other people will shift on the bench when the weight hits their chest, due to a lower level of leg activation, leading to less tension in the lower body. Sometimes, bringing the feet out to lower the knee position, or tucking the feet more to increase lower back engagement can help solve these problems.
Examples worth looking at are the Australian Strength Coach Bench Press instructional video on YouTube. He teaches a tucked foot, toe only position to all his athletes. Secondly, Louie Simmons - who teaches his athletes that tucked feet mean a tighter position and less “leg drive”; and splayed feet (the goal for all his bench athletes) result in more difficulty maintaining tension, but more “leg drive”. Louie Simmons predominantly coaches equipped lifters - and in many of their federations, a technique known as “heaving” is used; where you allow the bar to sink into the bench shirt and relax at the bottom of the descent, and then initiate the press by driving your legs into the floor, “heaving” the bar off your chest for a more explosive press.
Josh Bryant, a world renowned bench press coach, seems to coach lower body tension with little regard for actual foot placement. As long as they can produce the tension in the lower body, foot placement doesn’t particularly matter. I only say this because in his bench press book, an excellent resource - he doesn’t mention foot placement at all (showing it’s overall importance). At EliteFTS, Dave Tate and J M Blakely both teach the bench press in their own unique way - however, they agree on one thing with regards to “leg drive”. It is all about lower body tension. The tighter you are, the more force you can put back into the bar. The end.
Common Sticking Points
Sticking points, also known as ‘minimaxes’, are the key points within a lift where failure is most likely. The first and most important thing I will say about sticking points is: if you press explosively with enough speed, sticking points do not exist. The goal of every bench press should be to drive off the chest with enough force, and to apply that force continuously until just before the lockout - so that there is no possible opportunity for sticking points to rear their ugly heads. As Josh Bryant says in his book, “If you want to keep on trucking the weight to lockout, hit the gas!”
The best way to train for power off the chest is with full range of motion bench press variations. Wider grip bench press variations are a great way to develop this power, but be careful not to overuse these grips as they can compromise the shoulders. Other ways to train for power off the chest are low pin presses - where the bar rests on pins at approximately chest height, and it is driven to lockout without the aid of the eccentric portion of the lift. Dumbbell bench press also emphasises range of motion, as well as compensatory acceleration training (which I will touch on in the next section).
Other common sticking points are what I describe as the “transition point”; where the prime movers change from chest and shoulders to the triceps, and the lockout. These are common, however individual experience may vary, and you might encounter a sticking point somewhere else in the lift.
The “transition point” sticking point is generally a result of low speed off the chest, too much bicep engagement preventing tricep activation, poor bar control resulting in a bad bar path, lack of tightness overall, weak pecs or shoulders, or a “hyperfocus” on sticking points. To address these, my main advice is to build a more explosive press with the methods described above. However, it is important to address your neural connection to your biceps, ensuring they can turn off efficiently when the triceps activate, which means training your biceps regularly. Also, make sure your setup is on point - and watch this sticking point fade out of existence. You can also use pin presses at the sticking point height, smaller board presses, isometrics, overcoming isometrics, and the floor press. For more information on these movements - check out EliteFTS or Josh Bryant’s instagram, website, or their ebooks.
The lockout sticking point is generally a result of weak triceps, as well as a combination of the other issues mentioned above (poor bar speed, bar path, or low strength endurance). Strength endurance is the ability to keep applying force throughout the entirety of the lift, and can be best trained with compensatory acceleration training (CAT). To fix the lockout, CAT with bands or chains, reverse band press, overcoming isometrics, higher board presses, or assisted bench press (using Mark Bell’s slingshot or the Harris Recoil, or a bench shirt if you are an equipped lifter). To address weak triceps, close grip bench, close grip floor press, and JM Press are some of the best movements out there.
The Need for Speed
As I have said multiple times by now, speed off the chest is essential. More often than not, an explosive lift is a successful lift. Technique and tension should not be sacrificed for explosive power, so it is important to continue to master technique while building explosive power - but if you want to move big weights, you need to do it fast. Many coaches have said some version of these words, most famously Louie Simmons of Westside - you can’t move a heavy weight slow. You have to move it as fast as possible, otherwise, it will stop dead in its tracks and there is very little hope of ever getting it moving again, leading to failure. Speed, force production, and explosive dynamic power should be a focus in all of your training.
To build a fast, powerful press, one of the best ways is called Compensatory Acceleration Training (CAT). Combined with Accommodating Resistance, CAT will allow you to consistently move heavy weights fast enough to blast through sticking points all the way to lockout. Remember, you can’t lift a heavy weight slow - only as fast as possible, or failure. So, what is CAT? Simply put, it is hitting the gas all the way to lockout. It is attempting every lift with explosive power in mind. Josh Bryant refers to this type of training as Movement Intention (as opposed to the common bodybuilder term, muscle intention, where the focus is on engaging every fibre of the muscle being trained). Where the bench press is concerned, the bar should be lowered under control - and then driven through to lockout with as much force as possible, never slowing down until right before lockout to allow the bar to come to a rest safely. This type of training takes practice, and should be completed with lower rep sets, with a hyperfocus on maintaining tension and excellent technique and control. It is also most effective against higher resistance, generally with loads that will not move quickly. Louie Simmons and Josh Bryant both recommend weights around 70-80% of your 1RM when there is just plates and the bar, or lower when there are chains or bands attached.
Why attach bands or chains? Well, training with these tools is known as accommodating resistance, meaning that the bar gets “heavier” the further through the lift you are. The closer you get to lockout, the more resistance the bar is providing - meaning you have no choice but to drive the bar to lockout or fail. It is a type of training commonly used by some of the strongest people in the world to force their lifts to become explosive and powerful. For more information on accommodating resistance and explosive training, have a read of some of my other articles - most notably training for power and training for strength. For other resources, check out the bottom of this article. Almost all of the resources included have extensive content about the benefits of CAT, as well as how to effectively train with bands. A quick guide is low rep sets with approximately 50% of your 1RM on the bar, plus 25% band tension (we use a doubled up red band on each side) for bench pressing. Make your lifts explosive and watch your max go up!
Conclusion
I have a love-hate relationship with the bench press. I am desperate to master it, and I am endlessly frustrated by its little intricacies. It is an easy lift to enjoy, but an incredibly difficult lift in which to make significant progress. It is also an extremely dangerous lift, and the risk of a huge bench press is only ever worth the reward for a very select few people who are deranged enough to want to hold hundreds of kilograms over their head in nothing but their hands. For those of you out there like me, who see that challenge as a mountain that must be climbed - thank you for taking the time to read this. I hope you have taken something away, as I have tried to summarise all that I have learned from some true masters of this lift. At the end of the day, if you change nothing else about your press - know that speed is king. Explode off the chest, and you will never fail.
Resources
Bench Press: The Science by Josh Bryant
Probably the best resource out there on raw benching. I learned more from this book than almost every other article and video out there - and if you are looking for a comprehensive guide to benching some big numbers as a raw powerlifter, it’s an essential read. Josh Bryant’s instagram, @JailhouseStrong, is an excellent free resource full of a large amount of educational content worth looking into.
The Bench Press Manual by Louie Simmons
Louie sucked at benching, so he spent a lot of time learning how to get good. This is a great resource for anyone who is interested in equipped bench press training, as well as some less traditional bench press training styles.
EliteFTS
Dave Tate’s company, EliteFTS, releases an enormous amount of free educational content about lifting and life on their website, elitefts.com. They also release videos on youtube and maintain a strong social media presence. Anyone who wants to learn everything there is to know about almost every kind of training should spend time learning from them.
Australian Strength Coach
Sebastian Oreb is Hafþór “The Mountain” Björnsson’s coach. Although The Mountain isn’t especially known for his bench press, an interesting story is that when he came to Australia and met the Australian Strength Coach for the first time, he tried out Sebastian Oreb’s signature bench press set up and immediately set a new PB in his flat bench press. The Australian Strength Coach guide to bench pressing on youtube is one of the best, most beginner friendly guides to setting up and completing a bench press I have ever seen, and is an excellent resource for any coach or bench athlete, regardless of experience.
Mark Bell, Super Training Gym
Mark Bell is a world class bench press athlete and powerlifting coached. Self titled “The People’s Coach”, he tries to provide complex information in a format that anyone can understand, and puts his money where his mouth is when it comes to training and nutrition. His youtube channel is an excellent resource for anyone looking to learn about how to move big weights, as well as utilise his patented Slingshot, a bench press training accessory that increases the safety of the movement, as well as allows for overload to be done on the bench press.
This is not a comprehensive list of resources, however it is a few of the notable ones that have made an impact on how I have learned to bench press myself, as well as how I have learned to coach the bench. I don’t have any big accolades to speak of, in fact the day before I wrote this article I finally got a new PB using a Recoil (similar to Mark Bell’s Slingshot) of 160kg. My goal of pressing 500lbs is inching closer by the day, and if you read this article and dive into the resources provided, you will get closer than ever to your own bench press goals.
Train Smart. Train Hard. Bench Big.
About Us
Anvil Training and Development is a group of Australian veterans who care about the physical and mental health of veterans and emergency service workers. We’re passionate about ongoing education and working with others to implement positive change.
Instagram: Anvil Training & Development - @anvil.td
Facebook: Anvil Training & Development - @anvil.td
www.anviltd.com
(Article Edited, Proof Read, and Fact-Checked by Charlotte Officer)
VES Mental Health Resources: https://anviltd.com/pages/ves-australian-mental-health-resources

Leave a comment